
What if there’s a way to supercharge your solar panels and heat your swimming pool? With solar panel cooling, it could be a win-win situation.
In this article, I’ll take you through my solar panel cooling experiment using pools and a DIY closed-loop system. We’ll talk about its limitations and whether it’s a practical solution to boost energy production.
Rather watch than read? Check out this 12-minute video.
My First Solar Panel Cooling Experiment
Before using pools and a closed-loop system, I started testing solar panel cooling with a more basic setup. Check out the blog article here.

In my initial experiment, I sprayed water on my solar panels, hoping to boost their power output. I ended up using a whopping 130 gallons of water, and it resulted in a 5% increase in power. While this was promising, the excessive water consumption made it impractical for everyday use.
So, I wanted to find a better solution. That’s when the closed-loop system came into the picture.
Setting Up the Closed-Loop System
The closed-loop system is more sophisticated than my water sprayer, and involves a carefully designed setup. Here are the materials I used:
- Half-inch PEX tubing
- Gorilla Tape
- A step drill bit
- Half-inch couplers (2)
- Styrofoam insulation material
First, I took the PEX tubing and started coiling it in a single layer on the back side of my solar panel. (Water will flow through these coils, extracting heat from the panel, and then return to a pool.)

Then, I drilled holes through the side of the panel’s rail to fit a half-inch coupler through each side. One side will serve as the inlet, while the other will be the outlet for the water.

Lastly, I attached a styrofoam insulator to the back of the panel to create a cooler environment.

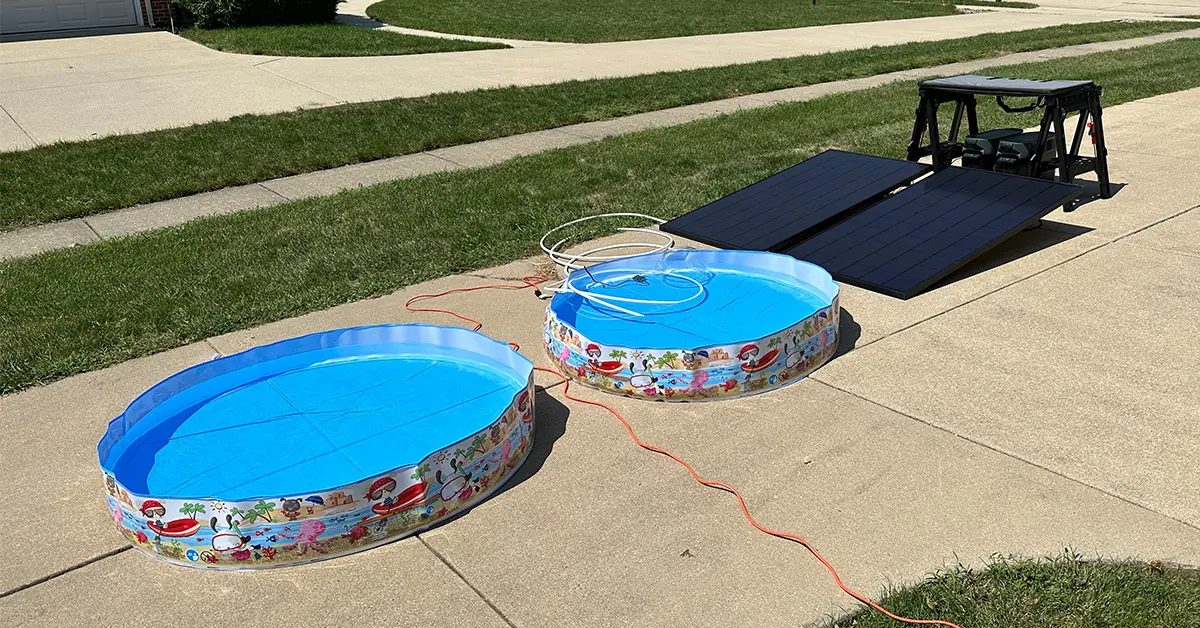
Round One: Testing the Closed-Loop System
To put my closed-loop system to the test, I set up two pools to compare: a baseline pool and a test pool with a cooling panel.

The setup was relatively straightforward. The water pumped through a clear tube into a connector, which then fed into the PEX coils on the back of the cooling panel. While the water circulated, I monitored the temperature and power output.
Round One Results: A Complete Fail
After more than an hour of testing, the results were not encouraging.
The cooling panel registered at a toasty 129 degrees Fahrenheit, while the baseline panel was slightly cooler at 120 degrees.

My power analyzers showed that the cooling panel produced only 708 watt-hours, and the baseline panel generated 729 watt-hours.

Surprisingly, my attempt at cooling actually reduced the amount of power produced. The test was a complete fail!
Clearly, I needed to make some modifications to the closed-loop system to make it more effective.
Round Two: Making Improvements
After the disappointing results of round one, I identified a few issues that might have been affecting the experiment.
The setup, which used styrofoam and tape, ended up trapping heat rather than cooling the panel. The PEX coils were not making proper contact with the panel, which meant they couldn’t effectively transfer heat away from the solar panel.
So, here’s a few improvements I made for round two:
- Removed Styrofoam and Tape: I began by dismantling the previous setup. The styrofoam and tape on the back were contributing to the problem, keeping a warmer environment inside the panel.
- Realigned the PEX Coils: The coils needed to be correctly aligned and pressed tightly against the panel. This was crucial for effective heat transfer.
- Increased Taping: To address the issue of loose coils and improve heat rejection, I used more Gorilla Tape.
- Applied Pressure: To ensure consistent contact between the coils and the panel, I used half-inch dowel rods spanning between the rails of the panel. This applied consistent pressure to the coils, hopefully aiding in heat rejection.

With these adjustments in place, I set up the panel for round two of testing.
Round Two Results: A Slight Improvement
The results of the second round of testing showed some improvement, but the concept still fell short of expectations.
The surface temperature of the cooling panel registered at 119.6 degrees Fahrenheit, and the uncooled panel at 122.3 degrees. That’s about a two-degree difference—a promising sign.

But, let’s see how this translated into energy production. The cooling panel generated 616 watt-hours, while the baseline panel produced 623 watt-hours. So again, the cooling panel fell short.

The Limitations of Cooling Solar Panels with a Pool
So, what went wrong? The limitations of using PEX lines to cool solar panels became apparent during my experiment:
- Inefficient Heat Transfer: PEX is a cost-effective material but not the most efficient when it comes to transferring heat. To achieve substantial cooling, a material with better heat transfer properties would be needed.
- Insufficient Surface Area: The amount of contact between the PEX lines and the panel’s surface was limited. To effectively cool the solar panel, a larger surface area would be required to extract more heat.
- Complex Setup: The closed-loop system involving pool water circulation, PEX lines, and additional components made the setup quite complex and potentially expensive for homeowners.
Considering Solar for Your Home
Before we wrap this up, I want to mention that if you’re considering solar for your home, a great place to start is SolarReviews.
They’ll get you an estimate of your system’s size and cost in a matter of minutes. And if you decide to move forward, they can also help you look at installers to ensure they have a solid reputation.
Conclusion: My Solar Panel Cooling Experiment
My experiment to cool solar panels with a closed-loop system yielded mixed results. While it showed promise, the materials and setup did not deliver the expected power output increase.
Sometimes, experiments that don’t go as planned can provide valuable insights for future breakthroughs. It’s clear that more research and innovation are needed to find a practical and cost-effective solution for cooling solar panels.
The quest for better heat transfer materials and methods continues, and I’m eager to collaborate with fellow enthusiasts to make solar energy even more efficient and accessible.
Stay tuned, and we’ll keep exploring the possibilities of solar energy together.