
Today, I’m going to guide you through setting up a simple DIY solar power system. This is a perfect starter system to help get you off the ground, so you can start powering your devices off-grid.
Whether you’re a camping enthusiast, a handyman with a tool trailer, or someone looking to power up that shed on your property, this affordable system should cost you under $200.
So, let’s dive in and get familiar with the tools and components needed.
Rather watch than read? Check out our 13-minute video.
Tools Needed for Your Solar Power System
First, here’s a look at the tools you need for this project:
- Renogy Charge Controller (10 amps): A DIY-friendly brand with affordability and functionality.
- Wire Stripper and Crimper: Simple tool for wiring and crimping.
- 12-Gauge Wire: Adequate for this setup, ensuring a safe and efficient connection.
- Battery: Options include sealed lead-acid or modern lithium, depending on your budget and needs.
- Ring Terminals: For secure connections between the battery and charge controller.
- Automotive Mini Fuse Holder (10 amps): Essential for protecting your system from overloads.
- Butt splice: To connect our fuse holder to our positive wire.
- MC4 Connectors: Popular solar panel connectors for easy and secure wiring.
- Solar Panel (100 Watts): The heart of your system, capturing sunlight to generate power.
Choosing the Right Battery
When it comes to batteries, the choice between lead acid and lithium can greatly impact your DIY solar setup. Consider your budget, capacity needs, and the longevity of your system when choosing the right battery.

Here’s a quick rundown of each battery option:
Sealed Lead Acid Battery
- Tried and true, cost-effective option.
- Heavier and less cycle life compared to lithium.
- Ideal for budget-friendly setups with basic power needs.
- Example: Thunderbolt 12V, 35Ah lead acid battery from Harbor Freight, priced around $75.
Lithium Battery
- Modern, lightweight, and longer cycle life.
- Higher upfront cost but potentially lasts for decades.
- Suitable for more demanding applications.
- Example: WEIZE 12V, 100Ah LiFePo battery from Amazon, priced around $300.
If you’re only going to run lights, (a common application with this setup), a lead acid battery is perfectly adequate.
Getting to Know The Charge Controller
Before we start, let’s get to know the charge controller. I’m using a Renogy Wanderer charge controller, a DIY-friendly device, featuring 10 amps of capacity.

This little powerhouse can handle 12 volts or 24 volts from the solar panels and deliver the same voltage to the battery. With outputs for both 12V and 24V, plus two USB-A outputs at 5V and 2A, it’s a functional and budget-friendly choice.
Connecting the Charge Controller to the Battery
Our project kicks off with the battery and the charge controller connection. Here’s how to connect them in 7 steps:
Step 1: Prepare the Wire
- Strip off less than half an inch of insulation from the 12-gauge wire using a wire stripper.
- Twist the wire strands together so no strands poke out.

Step 2: Connect to Charge Controller
- Open the charge controller terminals.
- Insert the wire and close the terminals securely.
- Perform a pull test to confirm a reliable connection.

Step 3: Attach Automotive Mini Fuse Holder to the Positive Wire
- Strip off about a half inch of the positive wire insulation.
- Crimp a butt splice onto the wire.
- Crimp the automotive mini fuse holder onto the other side of the butt splice.

Step 4: Attach Ring Terminal to the Positive Wire
- Crimp a ring terminal to the end of the automotive mini fuse holder wire.

Step 5: Attach Ring Terminal to the Negative Wire
- Strip off about a half inch of the negative wire insulation.
- Crimp a simple ring terminal onto the negative wire.
- Remember, perform a pull test on all of your crimps to avoid any bad connections.

Step 6: Attach Wires to the Battery
- Connect the positive wire to the positive battery stud, and the negative wire to the negative battery stud using bolts, washers and nuts. The correct order is: bolt, washer, ring terminal, battery post, washer, small lock washer, then the nut.
- Tighten each bolt on the positive and negative side.

Step 7: Fuse the Positive Side
- Insert a 10-amp fuse into the fuse holder, which will then power up your charge controller.

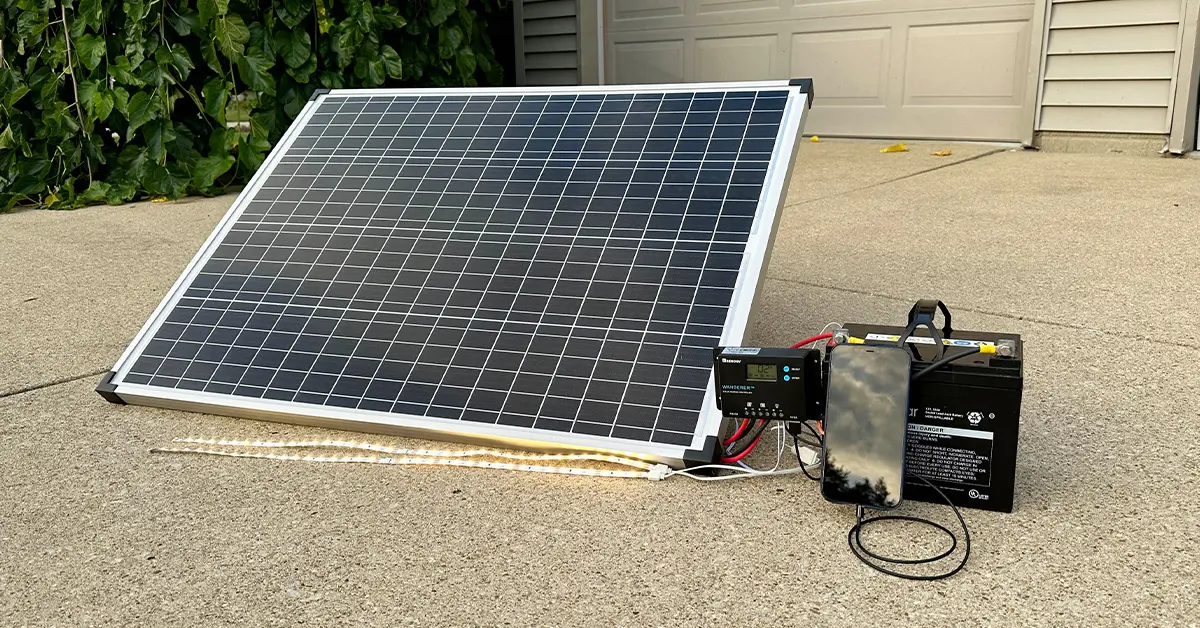
Once connected, the charge controller display will cycle through various metrics. It starts with PV panel metrics, moves to battery voltage, and displays any system load. Lastly, it will show the load mode.

Connecting the Solar Panels
With the battery connected and the charge controller powered up, it’s time to connect the solar panel. Here’s how:
1. Always connect the battery to the charge controller before connecting the solar panel. (Connecting panels to the charge controller without having the battery connected can damage your equipment.)

2. Use MC4 connectors on the 12-gauge wire, and strip off the opposite ends. If you need help crimping your MC4 connectors, check out our step-by-step guide.

3. Wire the solar panel to the charge controller side, ensuring a secure connection.

4. Connect the MC4 connectors together.

Now, you should be able to see power coming in on the charge controller display.
Checking Solar Panel Power Output
With your panels connected, monitor the charge controller display for voltage and current readings.
For example, I got a reading of 13.7V and 0.3A, which is quite low, but it’s an overcast day. With power coming from the panel, at least we know our wiring is correct. A future sunny day will really crank up our power!
Running Loads Off Your Solar System
Now, let’s bring your solar power system to life by powering up some loads. The charge controller is your ally here, capable of handling 12-volt loads and USB devices.

Experiment with different loads, like these 12-volt LED lights that could be used in sheds or camping sites. Or, you can charge devices like phones and tablets with USB-A ports.
If you’re considering running AC appliances, think about incorporating an inverter, but be mindful of the associated costs. Remember, strike a balance between functionality and your specific use case.
Considering Solar for Your Home
Before we wrap up, if you’re considering solar for your home, it’s crucial to determine the right system size to offset your monthly energy costs. A great place to start is SolarReviews, where you can get an estimate of your system’s size and cost.
If you decide to move forward, you’ll also get to look at installers and ensure they have a solid reputation, so you can have peace of mind during the warranty period.
Conclusion
And there you have it! We’ve successfully set up a DIY solar power system. This introductory system is a great foundation for expanding your off-grid capabilities.
As you gain more experience, you can explore adding more panels and different configurations. Check out our article for more on wiring multiple solar panels.
If you have any questions or want to share your experience, drop a comment below or join our Everyday Solar Facebook group for more insights. Stay tuned for more DIY solar adventures!